PlayStation 2 MECHACON Adjustment Program (PMAP)

Locked
User avatar
Archive
Posts: 891479
Joined: June 25th, 2019, 11:00 am

PlayStation 2 MECHACON Adjustment Program (PMAP)

Post by Archive » June 27th, 2019, 3:19 pm

posted by sp193 on Oct 18, 2016:

Preface: this is another one of my projects that has been sitting on my HDD for way too long. Gotta get a move on before it gets forgotten! Image

The PlayStation 2 Mechacon Adjustment Program (PMAP) is a tool for maintaining the PlayStation 2 CD/DVD subsystem.
SONY has its own official tools that aid in the maintanence process of their consoles. This program is a clone of their tools.

It offers the following functionality:

EEPROM maintenance and updating
Electrical circuit adjustment
Mechanism (skew) adjustment


The electrical circuit and mechanism adjustment functions offer jitter measurement, the jitter measurement is only a rough value.
Only real jitter measuring equipment can give an accurate measurement of jitter.

The electic circuit adjustment allows the gain to be adjusted automatically, while the mechanism adjustment allows the skew (tangential and radial) to be adjusted. For the SCPH-30001/DTL-H300xx B-chassis (GH-004 and GH-005), the AUTO-TILT motor can be automatically adjusted (radial skew).

EEPROM management includes applying updates to the EEPROM. They'll fix things like the tray seizing up (A and B-chassis).
It won't, however, fix bugs in the MECHACON's firmware because that is in ROM.
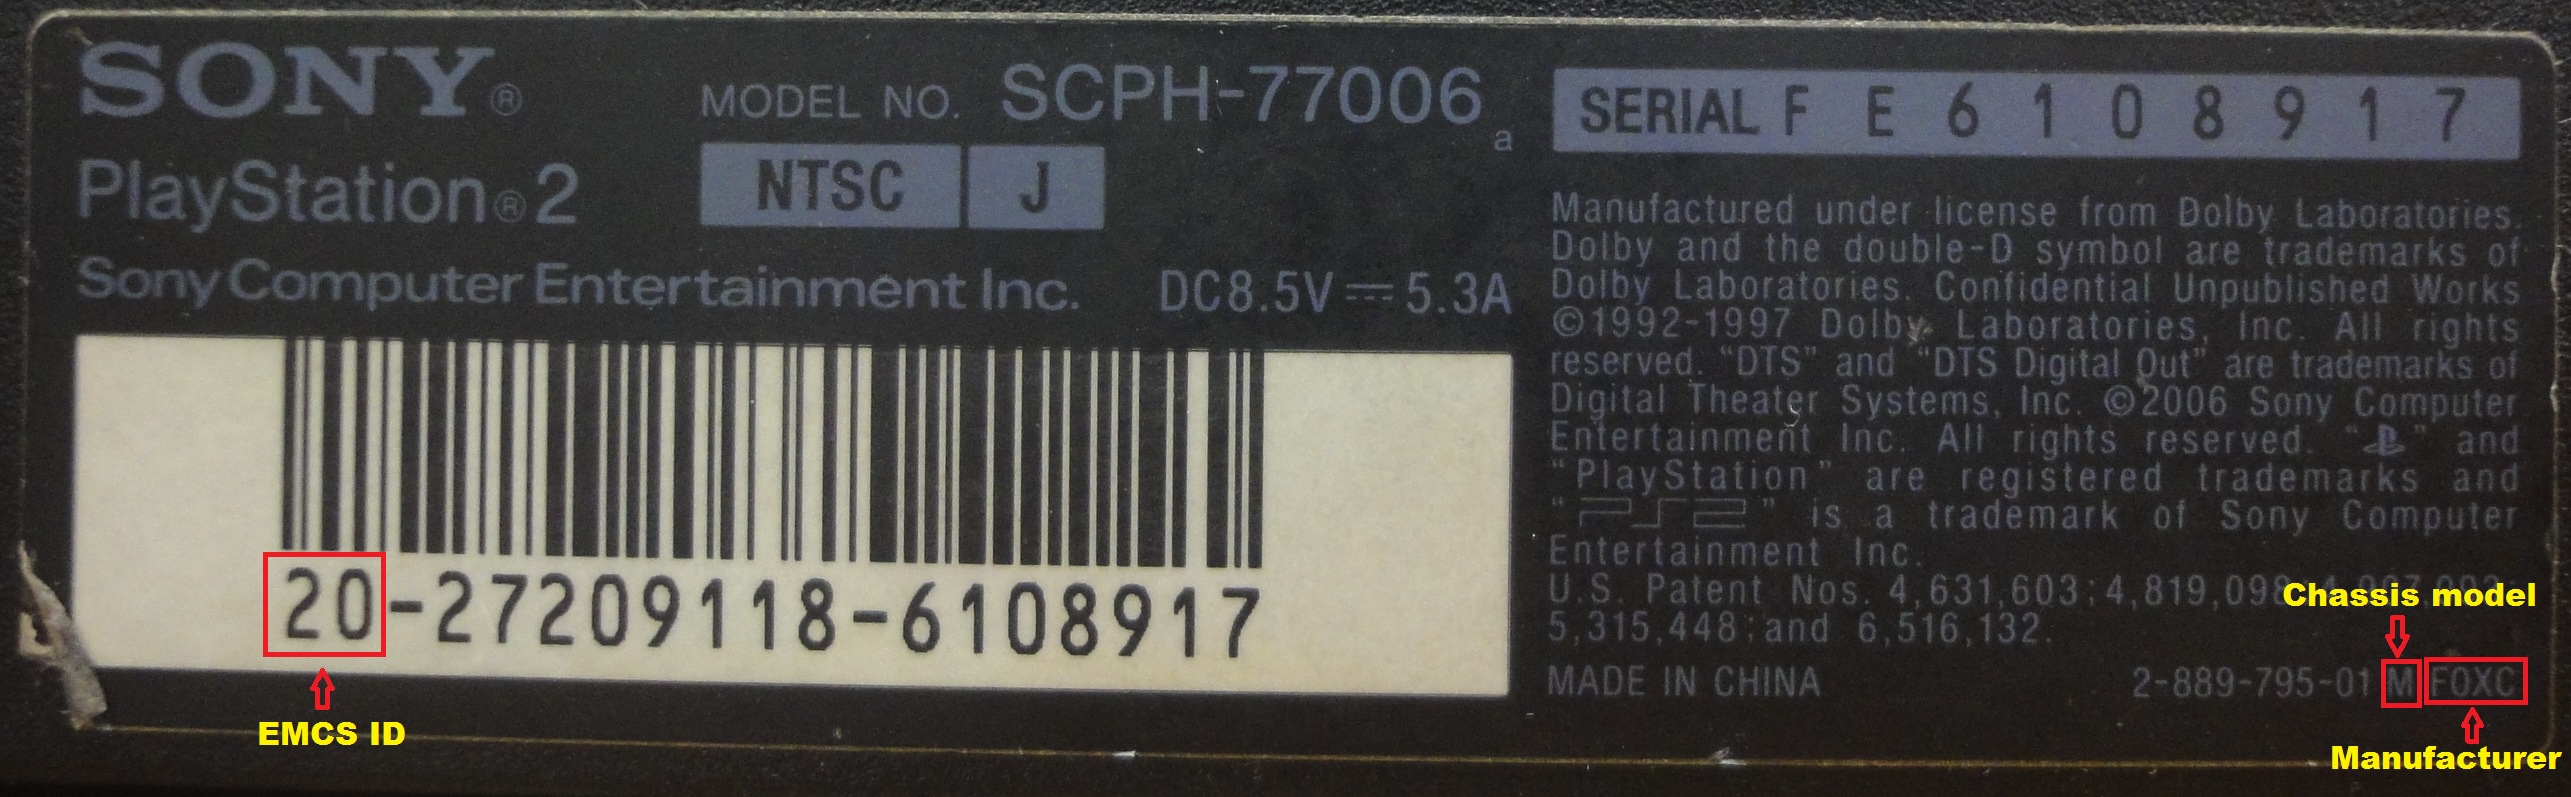
It will also allow the optical block (laser) type of a F-chassis or later to be changed (SANYO -> SONY, or vice-versa).
It will also allow the optical block's lens type to be changed (SONY T487 -> T609K, and vice-versa).

Warning! This is experimental software. While I took great care to ensure that I understood what I copied and its accuracy, it is still possible for mistakes to have been made!
Always make a dump of your EEPROM before making any adjustments or updates to the EEPROM.

However, it is currently NOT possible to restore a dump properly, for the Dragon MECHACON units (SCPH-50000). My tool currently bails out at the first error it encounters, so it messes up when the Dragon MECHACON refuses writes to the fixed/protected regions of the EEPROM. Therefore, unless you know what you are doing, do not use this tool on a Dragon unit because there is NO WAY to restore its EEPROM after messing it up.

As of now, a windowed Windows version is in the works. But because it is still quite far from completion and I am still going to be very busy, I have decided to push out whatever I have now.
It is a command-line version of the program, which has not been very well tested.
The sources allow for a Linux version, but I have not tested it in a long time. So for this release, there won't be a Linux version.

All consoles up to the SCPH-50000 (I-chassis) are supported.
As for the location of the test points (Tx, Rx, Gnd, 3.3V and RMC), please refer to the SONY service manuals.
You will need to connect a 3.3V RS232-compatible transceiver to Tx and Rx, and connect RMC to ground (it is pulled-up).

There is NO support for ID-management in this version, as the only purpose of such a system is to evade DNAS bans. As a result, all functions that can erase the ID section of the EEPROM have been disabled (to prevent mishaps).
DNAS may be already dead, but there still isn't a good reason for such a feature to exist. Besides, the know-how to change the IDs is already known.

Please refer to the README file for more information.
The testbed for this project was my S MINOKAMO SCPH-10000, which is a wrecked console (dead since 2012).

Personally, I don't have real-world experience with tinkering with the CD/DVD subsystem. So if there is anything that is wrong or doesn't make sense, please feel free to correct me or to give suggestions.

For now, the RTC update (resets the low battery/error status) function does not update the RTC's time.

I plan this to be an Assembler-only release because I believe that the folks here know what this is about.
In time as it matures, I'll make a project page for this on my website.

Ideally, I would like reports if the tool's EEPROM update function doesn't update the EEPROM correctly, but that is only possible if you used the SONY tool as well.
I can't legally distribute that one, so.... Image
The tools that were cloned, were the March 2003 versions.

Downloads/Links
PMAP v1.11: http://www.mediafire.com/file/zl4ga1u2q71lrh3/[161019]PMAP-bin.7z
PMAP v1.11 (source code): http://www.mediafire.com/file/24c1aasntjq7kh3/[161019]PMAP-noid.7z
 

User avatar
Archive
Posts: 891479
Joined: June 25th, 2019, 11:00 am

PlayStation 2 MECHACON Adjustment Program (PMAP)

Post by Archive » June 27th, 2019, 3:19 pm

posted by Bad_Ad84 on Apr 8, 2016:

This could come in handy, thanks for the awesome stuff you make.
 

User avatar
Archive
Posts: 891479
Joined: June 25th, 2019, 11:00 am

PlayStation 2 MECHACON Adjustment Program (PMAP)

Post by Archive » June 27th, 2019, 3:19 pm

posted by rama on Apr 8, 2016:

This sounds very promising in aiding with repairs and maintenance.
Can you say anything about slim consoles? Do they have these adjustments? Did you test any?
 

User avatar
Archive
Posts: 891479
Joined: June 25th, 2019, 11:00 am

PlayStation 2 MECHACON Adjustment Program (PMAP)

Post by Archive » June 27th, 2019, 3:19 pm

posted by sp193 on Apr 8, 2016:

This deserves a mention, although I didn't include this feature because I don't know if I should be: there is an initialization function for the Dragon MECHACON. It allows the MagicGate region and CEX status (CEX/DEX) to be selected.

However, when l_Oliveira tried it out, it gave error 100 (which isn't a runtime error).
The function has a check for a ID value of 0x00000000, so it might have just been meant to work with blank MECHACON chips.

Also, the diagnosis option in the browser actually automatically adjusts the gain and the radial skew (B-chassis only), but does not save the parameters to the EEPROM.

***


rama said:


Can you say anything about slim consoles? Do they have these adjustments? Did you test any?

They should have, but the SONY tool that I have stops short of supporting them. In fact, it doesn't even list the final 2 regions (11 and 12) of the SCPH-50000, so it probably wasn't even created at the end of that series.
While the commands for making adjustments are generally the same, SONY seems to have tailored some of the adjustment processes for the different consoles (i.e. sometimes the auto-gain function is not used, in favour of some work-around). Some of them also support newer commands, to cater for their newer functions (i.e. Dragon MECHACON).

So while it might be possible to simply adapt this tool to work with slimlines, it probably isn't a very good idea because they are fairly different from the older PlayStation 2 models.
I have not tested this tool with slimlines and the adjustment functions won't work on unsupported models, sorry.


Bad_Ad84 said:


This could come in handy, thanks for the awesome stuff you make.

Thanks!
 

User avatar
Archive
Posts: 891479
Joined: June 25th, 2019, 11:00 am

PlayStation 2 MECHACON Adjustment Program (PMAP)

Post by Archive » June 27th, 2019, 3:19 pm

posted by sp193 on Apr 8, 2016:

These points are also mentioned in the README file, but I would like to post them here too (to share information).

About Optical Block (OP) types:
There are two types of optical blocks: SONY and SANYO.
The SONY OP has SONY branding on it, while the SANYO OP has no branding.
Only consoles starting from the F-chassis can support the SANYO OP.

If the OP block is changed, the console must be reconfigured to support the new OP block.

About Object Lens types:
There are two types of lenses for the SONY OP: T487 and T609K (newer lens).
The T609K has a light yellow object lens protector (a ring around the object lens), while the T487 has a white protector.

For the D-chassis, the first lots of the KHS-400B with the T609K lens had a white object lens protector,
with a violet marking at the adjustment screw on the side of the base of the optical block.
Some lenses may have black, blue or green markings, but that does not mean that it is a new lens type.

There is no support for a SANYO OP with a T609K lens, so it's probably safe to assume that such a thing does not exist.

If the lens/OP block is swapped, the console must be reconfigured to support the new lens.

This probably means that all consoles (including the SCPH-10000) can support up to the KHS-400C, as there is an option for the T609K for all of them.
As there isn't an option for the T487 for newer models, the newer models probably can't support old optical blocks with the T487.
 

User avatar
Archive
Posts: 891479
Joined: June 25th, 2019, 11:00 am

PlayStation 2 MECHACON Adjustment Program (PMAP)

Post by Archive » June 27th, 2019, 3:19 pm

posted by sp193 on Apr 8, 2016:

How to determine your chassis model:

For most chassis models, your console's device information sticker will have this:


Spoiler

Image
Image


Consoles older than D-chassis (A, A+, AB, B and C) will not have them. They will also have a wire mesh behind their fans (top: SCPH-15000 A-chassis, bottom: SCPH-39006 G-chassis):


Spoiler
Image


A-chassis units: SCPH-10000 (GH-001), SCPH-15000 (GH-003), DTL-H10000, DTL-T10000(H)
B/B'-chassis units: SCPH-30001 and DTL-H300xx (GH-004/GH-005)
C/C'-chassis units: SCPH-30001/2/3/4 (GH-006/GH-007)
A+-chassis unit: SCPH-18000 (GH-003)
AB-chassis unit: SCPH-18000 (GH-008)

Only the B-chassis had an AUTO-TILT motor. The B-chassis PlayStation 2 was a US-only release.
The early non-Japanese DebugStation (TEST/DEX) units are B-chassis.

The C-chassis does not have an auto-tilt motor, otherwise it is the same as the B-chassis.
If the EEPROM was updated before, then the chassis ID (as ID'ed by the tool) will be different from the B-chassis .
 

User avatar
Archive
Posts: 891479
Joined: June 25th, 2019, 11:00 am

PlayStation 2 MECHACON Adjustment Program (PMAP)

Post by Archive » June 27th, 2019, 3:19 pm

posted by rama on Aug 12, 2016:

Got a couple questions.
- Will a 3.3v Arduino be fine as USB to TTL converter for the RS232 ?
- Where am I supposed to connect these additional test points to?
RFAC (JL601)
RFDC (JL608)
FE (JL605)
TE (JL607)
- Once I have everything hooked up, do I just start the pmap.exe with my Arduino com port?

Thanks for any help! Image
 

User avatar
Archive
Posts: 891479
Joined: June 25th, 2019, 11:00 am

PlayStation 2 MECHACON Adjustment Program (PMAP)

Post by Archive » June 27th, 2019, 3:19 pm

posted by sp193 on Aug 12, 2016:

rama said:


- Will a 3.3v Arduino be fine as USB to TTL converter for the RS232 ?

I don't see why not.


rama said:


- Where am I supposed to connect these additional test points to?
RFAC (JL601)
RFDC (JL608)
FE (JL605)
TE (JL607)

The right way to do adjustment, seems to be to use the service tool to set up the tests and to use external measurement equipment to check the results. The measurement equipment is connected to points like these.
The values displayed in the program are "rough estimations".

Right now, I cannot tell what should be connected to these points because my PC cannot open the old SONY help files. But FE and TE should be for the FE and TE loop gain.
There are also points for measuring the jitter level for CD and DVD reading, which a jitter meter is supposed to be connected to.

Unless you want to go that route, you don't have to use them.


rama said:


- Once I have everything hooked up, do I just start the pmap.exe with my Arduino com port?

Yup.
 

User avatar
Archive
Posts: 891479
Joined: June 25th, 2019, 11:00 am

PlayStation 2 MECHACON Adjustment Program (PMAP)

Post by Archive » June 27th, 2019, 3:19 pm

posted by rama on Dec 8, 2016:

Ah, I see. So I could hook an oscilloscope to these points, much like described in PSX service docs.
Thanks, that's all that I needed to give this a go. Will report back! Image

Managed to get the tools working Image
I used the Arduino for TTL to USB. Worked just fine.
Finding the test mode and TTL points on my GH-006 took a while. They're routed to the edge of the underside of the mainboard.
I'll take a picture next time I'm in there ;p
 

User avatar
Archive
Posts: 891479
Joined: June 25th, 2019, 11:00 am

PlayStation 2 MECHACON Adjustment Program (PMAP)

Post by Archive » June 27th, 2019, 3:19 pm

posted by sp193 on Aug 14, 2016:

At least the RMC, TxD, RxD and GND points are on the side of the Mainboard that is above the expansion bay, as the service jig tool gets inserted into the expansion bay. The jig will connect with these points without a need to take out the mainboard, but we do not have one.

For the PC CARD consoles, I don't think that anyone knows what its jig looks like. But based on one of the diagrams in the service jig manual for the expansion bay type, it looks like a base that the whole console will sit on. The base of the console is likely removed.
 

Locked